Designing your own garden can be rewarding and educational and you don't need to be a Landscape Architect to do it! Using the principles enumerated in our recent post, Planning your Spring/Summer Garden you can begin to turn your ideas into a physical reality.
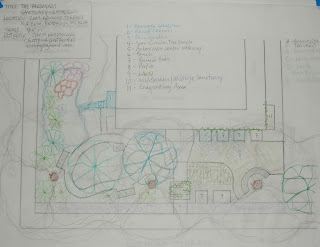
To get started, grab a measuring tape and record the dimensions of your garden. Then use a ruler and a piece of sketch or graph paper to draw the outline of your garden. To draw your garden to scale, assign a certain length to equal one inch. For example, if your garden is twenty feet long, you can set 1 inch equal to two feet. Using graph paper is even easier because the quadriles are already on the page. Also, if you're interested in creating your design online instead of on paper, you can use free design tools like Google Sketch-Up to create your garden.
After the outline of your garden is drawn, you can create stencils or symbols to represent your plants. If you would like, you can buy gardening or landscaping stencils, or you can go online and download pre-made symbols (see the link below for gardening symbols). Just print the symbols on card stock, cut them out, and use them to trace your design.
Before you begin populating your garden with symbols, remember to make a plant key! A plant key is very important because it will help you organize your ideas and your design. It is invaluable when it's time to start planting, because it is difficult to remember the ideal location for every plant and your helpers can find the plant location directly from the chart.
After your outline, symbols, and key have been made you can begin to design your garden. Remember to keep the principles we have recently discussed in mind: intercropping plant species, incorporating pollinator-friendly and pest-deterring plants, and crop rotation (to confuse pests). Also, keep spatial and height elements in mind when planning your garden. Taller plants and those that need trellising should be placed near walls or toward the back of the garden so they do not block the sunlight needed by low and medium height plants.
Remember to add some color to your design. Shrubs and vines can be given a dark green color, while sunflowers can be bright yellow. A garden design is a practical way to organize a garden, but it can also be a fun way to get your creative juices flowing. Your final design can become an artful homage to your edible landscape!
Photo of garden design courtesy of Chris Kreussling
Try using some of these symbols from the University of Minnesota: http://www.google.com/imgres?imgurl=http://www.sustland.umn.edu/design/images/landscapesym2.gif&imgrefurl=http://www.sustland.umn.edu/design/lanscapesym.html&usg=__HDT3tT0S076F0OirIIEK8QS6b28=&h=770&w=600&sz=57&hl=en&start=5&zoom=1&tbnid=Gb4v_FnVJOpKfM:&tbnh=142&tbnw=111&ei=Ia0ZT9-WDurg0QHW_e3fBA&prev=/search%3Fq%3Dplant%2Bsymbols%26um%3D1%26hl%3Den%26sa%3DN%26rls%3Dcom.microsoft:*:IE-SearchBox%26rlz%3D1I7ADFA_en%26tbm%3Disch&um=1&itbs=1
Welcome to Inland Empire Utilities Agency's (IEUA) Education Blog featuring up-to-date information on education programs and opportunities which focus on the environment and our most precious natural resource, WATER! IEUA provides various educational opportunities for the community including a free field trip program, bussing mini-grants, educator workshops, poster contests, educational grants, garden program, and much more!
Friday, January 27, 2012
Friday, January 20, 2012
Winter Garden Maintenance
The middle of January is a good time to do a little maintenance on your garden, even if you're not actively growing crops. Think of it this way: if you get a head start now, you'll have less work to do in the spring and summer. Here's a list to follow:
1) Weed your garden. Winter weeding is one of the best things you can do to ensure a successful yield in the summer. Most weeds sprout up in the winter, germinate in the spring and summer, set seed in the fall, and die when cold weather hits. If you can pull the weeds (or inhibit their access to sinlight) in the winter, then you have limited their chances of reseeding. Also, the longer a weed sits in the ground, the more time it has to establish roots, making it more difficult to extract. The moral of this story: pull weeds early and often.
2) Turn your compost. We all took our plant clippings, vegetable trimmings, and leaves and threw them into our compost bins at the end of the summer, but most of us probably forgot to turn our compost bins. If material has been in your bin since August or September, chances are it has already started decomposing. Give it a good turn and give those microdigesters some oxygen so you can have plenty of compost in the spring.
3) Prepare your gardening tools. If you're like me, you probably left a couple of tools outside and they've turned a nice shade of rust by now. Pick up your tools, clean them off (you can use a brilo pad or sand paper to scratch away at rust), and organize your tools. You might even want to get a head start and see if your local garden supply store has plant food that you can stock up on.
4) Stock up on seeds and trays. One of the many benefits of living in California is the immense amount of sunlight and good weather. So Cal gardeners can start a seed tray as early as January and be ready to plant by mid-March. Just remember to keep your seedlings inside by a window so they can be shielded from any unexpected weather. Also, if your local garden supply store doesn't have seeds yet, you can also go online and order them.
5) Prepare and repair. If you garden in pots, now is a good time to get rid of your old soil and give the inside of your pot a good scrubbing. Cleaning the inside of a garden pot is suggested so you can kill any mold or bacteria living on the walls of the vessel. Or if you garden in plant boxes, make sure boxes are in good condition. Finally, if you prefer in-ground planting, add soil additives like lime or clay conditioner today.
Good luck with your gardens!
Planning your Spring/Summer Garden
The middle of winter is a good time to plan your garden. Good planning can help you avoid pest issues and ensure a good yield over the summer.
How to plan your spring/summer line-up:
- Rotate your crops. Pests, molds and viruses love it when the same crops are planted in the same location year after year because they don't have to go far to get their favorite food. Also, know which familes your plants belong too. Plants in the same family, such as the Nightshade family (tomatoes, eggplants, and potatoes) or the Brassicaceae family (broccoli, cauliflower, and Brussel sprouts) tend to attract similar insects, so it's a good idea to mix these up a bit.
- Intercrop. As we learned from the Integrated Pest Management post (http://ieuagies.blogspot.com/2011/12/integrated-pest-management.html), intercropping reduces garden pests by limiting the amount of any one plant type found in the same area. Additionally, intercropping refers to the strategic planting of pest-repelling plants, such as marigold, garlic, and certain herbs (dill and mint) to ward off infestation.
- Attract beneficial insects. Remember to incorporate flowering plants for pollinators and clovers, mustards, dill, and chives for ladybugs. These plants can be intercropped with vegetable plants to act as companion plants.
- Good timing leads to better yield. In a well-planned garden, you can often increase your yield if you incorporate the plant's 'time to maturation' into your time schedule. In the case of tomatoes, there are three varieties: early maturing plants (40-55 days: Early Girl & Early Wonder), mid-season plants (56-75 days: Better Boy & Celebrity), and late-season plants (76-95 days: Brandywine & Cherokee Purple). Planting some of each variety will ensure that you have tomatoes all summer long and well into the fall. Check the information on the seed packet to determine the time to maturation for vegetables.
After you decide which plants you would like to incorporate into your garden you can begin to draft a design for the space. See our upcoming blog post: Designing your Spring/Summer Garden to get inspired.
Subscribe to:
Posts (Atom)